Exhaust
The very first modification was carried out before I had even seen the bike, I purchased some Megacycle bolt-on mufflers to replace the stock cans and had the dealer fit them during pre-delivery. I still have the stock cans complete in their original plastic heat-shrink. The cans were cheap, they are well built and being a straight through muffler they are loud. The chromed steel end caps are holding up well and haven't discoloured at all. A bit of aluminium polish keeps the surface nice and shiny. Here is Megacycle's home page.
Next was a full M4 stainless steel system with aluminium cans.
|
|
Airbox
In a round-about way I managed to get hold of an airbox from the wreckers and have it modified. Basically the intake tower was gutted. The flapper valve and acutator were removed and the bottom opening enlarged, reshaped and sealed up with carbon fibre. The work was done by a fellow TL enthusiast in Sydney, you can check out his homepage and mods here. After a couple of runs on the dyno and a re-map it was a very successful mod with no compromised made to low or mid range power. A gain was seen right across the full rev range.
I also fitted some TLR bellmouths into the airbox. They fit into the airbox rubber boots perfectly and the boots have a lip in them that stops the bellmouths from being inserted too far. I drilled 3 holes in the airbox to mount each bellmouth and used nyloc nuts so there was no chance of them coming loose and have a screw bounce down into the throttle body. More positive dyno results too.
|
|
ECU Re-mapper
I purchased a re-mapper so I could alter the mixture / fuel delivery by the ECU. This was to compensate for the better flowing exhaust and airbox. Its operation and control is identical to the Yoshimura R-421 re-programmer.
|
|
Brakes
To improve brake lever feel I fitted Goodridge Stainless Steel braided brake lines (to the front only) covered with a translucent red covering. I settled for the standard set-up rather than a dual line / race setup from the master cylinder. I didn't worry about the rear as I very rarely use this brake anyway. I also opted for the chrome banjo bolts. These lines came from John Stamnas P/L and I purchased them at the same time as my heavy duty clutch springs.
Next I fitted TLR 6 piston callipers and a TLR 5/8" master cylinder (vs. the TLS 14mm one.) It was a straight forward swap and install. I kept the Goodridge lines I fitted to the stock 4 piston calipers.
|
|
Chain Guard
I had to remove the ugly hoe hanging off the back that are fitted to the Australian spec'ed machines. I replaced it with a GSXR600 chain guard, I would have liked a hugger but at the time $60 vs. $300+ I had no choice. A hugger is on the shopping list now. As I bought the bike in 1999 I imagine it was a '99 600 chain guard. I don't know how much the GSXR600's changed over the years.
|
|
Rear Hugger
I finally got the $$$ together and bought a carbon rear hugger. I bought it from Geelong Carbon Craft It is well made and well styled and suites the TLS just nicely. As soon as I get a decent photo of it fitted I'll put it up. The one I have is a bit bodgey.
I'm currently running a Pirelli Super Corsa 190/55. This tyre wont fit under the hugger so I'm back to a chain guard. I'm not sure how the clearance would be with a 180/55 as I've not tried it. The standard 190/50 is fine.
|
|
Tank protector
I also bought a half tank bra before I picked the bike up too. It's a Lockhart Phillips
one. It does a good job of protecting the tank and it has only ever come off once while riding. It didn't come completely off but the elastic strap around the front of the tank slipped up and over it.
The LP tank protector has gone, just for a change I've fitted a Replico carbon fibre tank protector. It may look a bit big in the picture, but in real life it looks quite good IMHO and does the job. Geelong Carbon Craft does a nice wrap around job too, it wraps around the knee indents of the tank.
|
|
Rear Sprocket
I replaced the standard rear sprocket with a 40T one. TLS stock gearing is 17/38. This gives a final drive ratio of 2.235:1, 17/40 gives 2.353:1 for a difference of 5%. This means the speedo is 5% out plus the original speedo error if any. A 2UP rear will fit on with the stock 104 link chain length. It has to be rolled over the sprocket before the axle is inserted so the wheel can be rolled far enough forward. As can be seen in the picture the adjusters are screwed a fair way in but there is still room for adjustment.
I'm now running a 42T rear for 17/42 (+4 on the rear). I did this when I fitted a new chain as it was easy to cut it to the 106 links I needed.
|
|
BC 800
I fitted a Sigma Sport BC-800 pushbike speedo so I had an accurate speedo and odo because the OEM one was out because of the gearing change. It has some other handy functions, this unit displays maximum speed, average speed and at a glance whether you are travelling above or below the average speed. A trip meter and total odometer. A clock, a stopwatch that records time in motion. It can display
MPH or KPH to a maximum of 300km/h. (Try here Sigma Sport )


Here it is fitted along with the pickup.
|
|
Yellow box
Next addition was a Yellow Box Speedo recalibrator. I fitted this as I wanted my OEM Speedo and Odometer accurate again after the gearing change. I still have the BC800 fitted as I still use some of its features, like the clock, average speed, maximum speed and riding time etc. Installation and set-up was simple and is explained
here on my Yellow Box page.
|
|
Clutch
I've done so many things to my clutch to stop it slipping it has a page of its own now. Shimming, aftermarket springs, new plates all documented here on my clutch page.
|
|
ATRE
Also fitted was an ATRE unit. (Active Timing Retard Eliminator). I've since removed this unit in favour of my own homemade one because my GPS (gear position sensor) is faulty. My ATRE installation has its own page here. Information on contruction and fitting of my homemade TRE is here.
|
|
Steering Damper
After hearing people say how better their OEM steering dampers were after changing the fluid I thought I'd try it too. I replaced the OEM fluid with 2.5W fork oil. The mod was cheap, easy and quick to do and well worth it. Low speed manoeuvrability is better yet it has still saved me from a slapper or two. I fitted some clear tubing of the damper nipple and to the end of a funnel, filled the funnel with the fluid and just slowly pumped the damper until all the air in it was removed. It will take time and patience. Use slow full strokes. If you try to do it too fast the opposite side seal will suck air in through it. You can hear any air in the damper by listening carefully while pushing and pulling the shaft. Keep going until you hear no more air in it. Remove the funnel and refit the torx screw and recheck for air. Leave the damper sit for a few hours and try it again before fitting it to the bike (just to make sure).
|
|
Radiator Guard
When I was washing the bike for the first time I noticed a ding in the radiator caused by a stone. If it had hit a few mm higher or lower I think it would have put a hole in the core. So I made up my own radiator guard to protect it. The guard is made from plastic mesh very similar to "gutter guard". The bike has no cooling problems with it fitted and the plastic handles the radiator heat too.
|
|
Headlight Protector
I cut out and fitted a "Lite-Skinz" head light protector. After 12,000Km it was starting to show signs of bubbling directly in front of the bulbs. Nothing major, just detracts slightly from otherwise a very good product.
|
|
Windscreen
The standard screen was replaced with a translucent blood red one. I bought this from Visual Screens
|
|
LED Indicators
I replaced the bulky OEM indicators with LED's all round. I didn't go with flushmounts as I wanted to keep as much visibility as possible and thought these ones looked OK. They appear bright enough and with any luck cagers will see them flashing when I'm using them.
|
|
Rear Stand
I built my own universal rear paddock stand for my TLS. It comes in handy for
maintenance work, especially with removing the rear wheel due to the way this thing consumes rear tyres. Want to build one of your own? I've posted dimensioned drawings and information about it here.
|
|
Race Tech fork Springs
I fitted some 1kg/mm Race Tech fork springs and used 10WT fork oil. I set them up with 13mm of spring preload via some of the washers supplied with the kit. Here is a link to their website Race Tech
|
|
Bitubo Rear Shock
I purchased a Bitubo rear shock as part of a group buy for a good price. This replaces the standard spring on a stick and the standard rotary damper. It's adjustable for compression damping (on the remote reservoir) and rebound damping. It comes complete with a tool for adjusting the spring preload too. Fitting is straight foward although some bits are a little awkward. For the weight watchers there is a little over 2kg (4.5lbs+) saving. Here is a link to their website Bitubo
|
|
Ride Height Adjuster
I purchased a RHA in yet another TLZone group buy. I've wrote a bit of a write about it Here! This replaces the standard link from the swingarm to the dog-leg and by altering it's length you can alter the swinarm angle which raises or lowers the rear end and will affect the way the bike handles as it alters some of the steering geometry as the rear is raised or lowered.
|
|
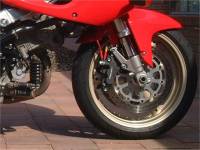
TLR Front Fender / Guard
I prefer the looks / shape and style of the TLR fender compared to the stock TLS one. I purchased one online and sent it to a painter and had it painted red to suit the bike. Top picture is the TLS standard guard. The bottom picture is the TLR guard. It's a straight bolt on affair, no modifying or changes needed.
|
|
Frame Sliders
I got this set of frame sliders as part of a group buy on TLZone Hopefully I'll never need to test them out. Installation was a breeze and the price was definitely right. (As well as protecting the frame, I'm hoping that combined with the bar ends they will help protect the radiator too. But I do realise they are frame sliders / protectors and not fairing / plastic protectors).
|
|
Bar Ends
Delrin bar ends from Intuitive Race Products These are longer than OEM and save 425g (nearly 1 lb). I've noticed no extra vibrations or any other side effects since fitting them.
|
|
Coerce Sprocket Cover
I fitted a Coerce sprocket cover. It's more of a speedo sensor mount than a sprocket cover. I still have to come up with a way of capping off the clutch actuator to stop it getting crud and stuff in it. This is a mod with no real benefit other than replacing the OEM cover. Keeping the area clean of chain lube isn't a real issue as I would regulary remove the OEM cover and clean the area anyway.
|
|
Breather Mod
I have my own thoughts on the oil in the airbox problem I have with my bike. I think it's something to do with the air being able to flow in and out of the cam cover line which means the reed valve in the crank case can't recover the oil like it is supposed to. I wanted to fit a one way valve to the cam cover line. But for it to work properly this had to be at the highest point in the system and the only valve I could think of that was readily available was a PCV out of a car. For the PCV to work properly pressure had to be fed to the bottom of it. So I mounted it in a small homemade separator. To allow oil to return to the crank case I fitted another line and plumbed it to the clutch cover. Now, all air entering the cases must enter via the OEM reed and drag oil from the OEM separator with it. All air leaving the engine leaves via the cam cover or clutch cover - flows to the OEM separator which is vented to atmosphere via the airbox as per standard.
|
|
Auto Decompressors
When I had the cams out to adjust the valve clearances I removed the auto-decomps
from both exhaust cams. I did it because I didn't like them (and got to remove some rotating mass). I stopped short of pulling the scissor gears off though. To remove the one on the rear cam was fairly straight forward as I could slide it off the end of the cam. The front one was a little more awkward because it is on the cam gear side. I wrapped the cam up in a rag the taped it tight and used a grinder to grind most of the way through the assembly the snapped it off using a screwdriver as a wedge. I've noticed no ill effects at all and the engine starts fine on the original battery. There's also no noticable advantage either. Would I do it again? Yes!
|
|
Ventura Rally Pack
Ventura pack rack and "Rally Pack" bag. To see it fitted click here. It is really quick and simple to remove the rack when it's not needed and only a couple of inconspicuous tubes remain on the bike. The bag itself is of a good size and it has a zipper that runs around its circumference that allows the bag to fully expand and hold more gear.
|
|
Skinz Bike Cover
I also have a Skinz custom made bike cover. You can pick a two-tone colour
scheme from any of the 4 standard colors. They can also embroid any name, graphic or logo you want on it. I just had TLPlanet.com on one side and the Suzuki "S" centre front embroided on it. Being a custom cover, they're made for the year, make and model of bike. The covers are breathable, machine washable and guaranteed not to scratch your paint.
|
|
Track Day Gear
I picked up some race glass fairings. These are a two piece fibre-glass set. Fitting was straight forward. The headlight has to be removed to fit the front section. The front indicators and overflow bottle get removed with the OEM fairing. The kit came with another coolant overflow bottle that mounts to the headlight bracket. OEM ram air tubes can be used. The tail light has to be removed to fit the rear section. As part of yet another TLPLanet group buy I also have some mirror block off plates to take the place of the mirror mount when they're removed and keep the top of the fairing attached to the fairing stay. I also have an XT Racing laptimer. Operation is automatic as long a beacon / transmitter is set-up at the track.

 XT Racing
 laptimer and mirror block off plate.
|
|
Workshop Manual
I purchased the OEM workshop manual for my TL1000S and it has become an invaluable tool. A must for any home mechanic. It does expect a fair bit of mechanical knowledge to decipher it at times but there are some jobs I just wouldn't tackle without it. I also have the TLS microfiche, but since then
I've downloaded a copy of it onto my computer
|
|
As it sits today
Handling: Bitubo rear shock, Rear ride height adjuster, Race Tech fork springs, 2.5W Steering Damper, SS Brake Lines, 6 pot calipers, 5/8" MC, Round tyres.
Performance: M4 full exhaust system, SATRE, 42T Rear sprocket (+4), Gutted airbox, TLR Bellmouths, ECU re-map, Barnett Clutch Springs.
Cosmetic: TLR Fender, Bikescreens Screen, Logo cut SS heel plates, Carbon Hugger, Carbon tank protector, Coerce sprocket cover, LED Indicators all round, Trimmed rear fender.
Functional: Derlin Frame Sliders, Derlin Bar ends, Lite Skinz Headlight protector, Radiator Guard, Yellow Box, Venture Rack set up.
Track days: Two piece fibre-glass fairings, Clear Screen, Ram air tubes, Mirror Block Off Plates, Automatic Laptimer.
Miscellaneous: Vanity plates, Warning stickers removed.
|